HP Laserjet Pro M15W, M14-M17 - Clear paper jams
HP Laserjet Pro M15W, M14-M17 - Clear paper jams
Introduction
The following information includes instructions for clearing paper jams from the printer.
Jam locations
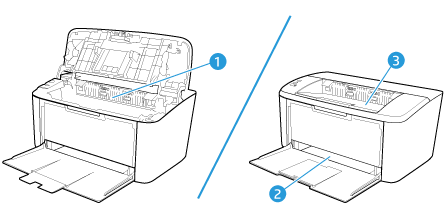
Jams can occur at the following locations in the product.

|
1
|
Internal areas
|
|
2
|
Input tray
|
|
3
|
Output bin
|
NOTE:Jams can occur in more than one location.
Experiencing frequent or recurring paper jams?
Follow these steps to solve problems with frequent paper jams. If the first step does not resolve the problem continue with the next step until you have resolved the problem.
-
If paper has jammed in the printer, clear the jam and then print a configuration page to test the printer.
-
Check that the tray is configured for the correct paper size and type. Adjust paper settings if necessary.
-
Print a configuration page to determine the IP address or host name.
-
Press and hold the Resume/Cancel
 button until the Ready
  light begins blinking.
 -
Release the Resume/Cancel
 button.
-
-
Open a web browser, and in the address line, type the IP address or host name exactly as it displays on the printer configuration page. Press the Enter key on the computer keyboard. The EWS opens.Figure : Example of an IP address in a browser window

NOTE:
If the web browser displays a message indicating that accessing the website might not be safe, select the option to continue to the website. Accessing this website will not harm the computer. -
Click the System tab, and then click the Paper Setup page.
-
Select the type of paper that is in the tray.
-
Select the size of paper that is in the tray.
-
-
Turn the printer off, wait 30 seconds, and then turn it on again.
-
Print a cleaning page to remove excess toner from inside the printer.
-
Open the HP Printer Assistant.
-
Windows 10: From the Start menu, click All Apps, click HP, and then select the printer name.
-
Windows 8.1: Click the down arrow in lower left corner of the Start screen, and then select the printer name.
-
Windows 8: Right-click an empty area on the Start screen, click All Apps on the app bar, and then select the printer name.
-
Windows 7: From the computer desktop, click Start, select All Programs, click HP, click the folder for the printer, and then select the printer name.
-
-
In the HP Printer Assistant, select Print, and then select HP Device Toolbox.
-
On the System tab, click Service.
-
In the Cleaning Mode area, click Start to begin the cleaning process.
-
-
Print a configuration page to test the printer.
-
Press and hold the Resume/Cancel
 button until the Ready
  light begins blinking.
 -
Release the Resume/Cancel
 button.
-
If none of these steps resolves the problem, the printer might need service. Contact HP customer support.
Clear jams from the input tray
CAUTION:Do not use sharp objects, such as tweezers or needle-nose pliers, to remove jams. Damage caused by sharp objects will not be covered by the warranty.When removing jammed media, pull the jammed media straight away from the product. Pulling jammed media out of the product at an angle can damage the product.
NOTE:Depending on where the jam is located, some of the following steps might not be necessary.
-
Open the print-cartridge door, and then remove the print cartridge.Figure : Print-cartridge door opened

-
Remove the media stack from the input tray.Figure : Tray 1 media removed

-
With both hands, grasp the side of the jammed media that is most visible (this includes the middle), and carefully pull it free from the product.Figure : Jammed media removed

-
Reinstall the print cartridge, and then close the print-cartridge door.Figure : Print cartridge reinstalled

Clear jams from inside the product
-
Open the print-cartridge door, and then remove the print cartridge.Figure : remove the print cartridge

CAUTION:
To prevent damage, do not expose the print cartridge to light. Cover it with a piece of paper. -
If you can see the jammed paper, carefully grasp the jammed paper, and slowly pull it out of the product.Figure : remove the jammed paper

-
Reinstall the print cartridge, and then close the print-cartridge door.Figure : replace the print cartridge

Clear jams from the output areas
CAUTION:Do not use sharp objects, such as tweezers or needle-nose pliers, to remove jams. Damage caused by sharp objects will not be covered by the warranty.
-
Open the print-cartridge door, and then remove the print cartridge.Figure : Print cartridge reinstalled

-
Keep the print cartridge door open, and then with both hands, grasp the side of the jammed media that is most visible (this includes the middle), and carefully pull it free from the product.Figure : remove the jammed paper

-
Reinstall the print cartridge, and then close the print-cartridge door.Figure : replace the print cartridge

https://support.hp.com/
Comments
Post a Comment