HP Laserjet Pro M15W, M14-M17 Printer Series - Printer Does Not Pick Paper
HP Laserjet Pro M15W, M14-M17 Printer Series - Printer Does Not Pick Paper
This document is for HP LaserJet Pro M15a, M15w, M16a, M17a, and M17w printers.
The Attention light blinks, or an Out of Paper message displays on the computer, and the printer does not pick up paper from the input tray.
Step 1: Check the paper, and then reload it
Paper feed issues might result from using ripped, dusty, curled, wrinkled, or bent paper. The quality of the paper can also make a difference. Follow these guidelines to help avoid the issue.
-
Use only good quality paper that meets printer specifications.
-
Store all paper in a dry, cool place. Paper feed issues occur more often in humid climates.
-
Wait for the printer to complete a job or the Attention light to blink before you reload the paper.
Make sure the paper you are using is in good condition, stacked neatly in the tray, and the paper path and tray are free from obstructions.
-
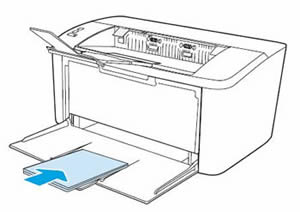
Remove the paper stack from the input tray.
-
Remove any severely bent, wrinkled, or torn paper from the stack.
-
Holding the paper stack in both hands, flex the stack to form a U shape, and then flex the stack in the opposite direction to loosen stuck paper sheets.

-
Load up to 150 sheets of paper with the print side facing up and the top edge toward the printer into the input tray, and then slide the stack forward until it stops.
-
Slide in the paper guides so that they are resting against the stack of paper.

Try to print. If the issue persists, continue to the next step.
Step 2: Check the paper size and type settings
Change the input tray settings from the printer control panel or the program you are trying to print from.
Windows
Mac
Step 3: Print a cleaning page to clean the paper feed and pick rollers
Dust, paper fiber, and other debris might accumulate on the rollers, causing paper jams and paper feed issues. Printing a cleaning page can clean the main paper feed and pick rollers without having to clean them manually. Clean the rollers inside the printer, and then try to print.
NOTE:If your printer is connected to a Mac computer, skip to the next step.
-
Search Windows for your printer model, and then click the printer name in the list of results.HP Printer Assistant opens.
-
Click Print, and then click HP Device Toolbox.
-
Click the System tab, and then select the Service page.
-
In the Cleaning Mode area, click Start to begin the cleaning process.
Try to print. If the issue persists, continue to the next step.
Step 4: Clean the pickup roller
Dust, paper fiber, and other debris might accumulate on the pickup roller and cause paper feed issues. Clean the pickup roller inside the printer, and then try to print again.
-
Turn off the printer.
-
Unplug the power cord from the back of the printer, and then wait for the printer to cool.
-
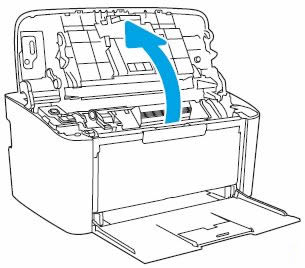
Open the toner cartridge access door.
-
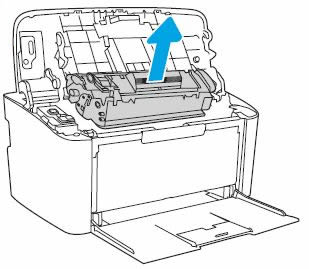
Grasp the handle on the toner cartridge, and then pull the toner cartridge out to remove it.
-
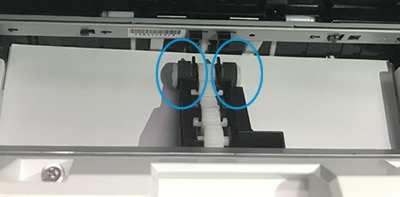
Find the pickup rollers.
-
Lightly dampen a lint-free cloth with bottled or distilled water, and then squeeze any excess liquid from the cloth.
-
Clean the pickup rollers, applying a moderate amount of pressure.
-
Allow the pickup rollers to dry completely (approximately 10 minutes).
-
Reinstall the toner cartridge, and then close the toner cartridge access door.
-
Plug the power cord into the rear of the printer, and then turn on the printer.
Try to print. If the issue persists, continue to the next step.
Step 5: Reset the printer
Sometimes an error persists even though there is no paper feed issue.
-
Turn the printer on, if it is not already on.
-
Wait until the printer is idle and silent before you continue.
-
With the printer turned on, disconnect the power cord from the rear of the printer.
-
Unplug the power cord from the wall outlet.
-
Wait at least 60 seconds.
-
Plug the power cord back into the wall outlet.
NOTE:
HP recommends connecting the printer power cord directly to the wall outlet. -
Reconnect the power cord to the rear of the printer.
-
Turn on the printer, if it does not automatically turn on.The printer might go through a warm-up period. The printer lights might flash, and the carriage might move.
-
Wait until the warm-up period finishes and your printer is idle and silent before you proceed.
Try to print. If the problem persists, continue to the next step.
Step 6: Service the printer
Service or replace your HP product if you completed all preceding steps.
https://support.hp.com/


Comments
Post a Comment